Creating a no-auth Spotify playlist preview with Next.js
Let's build a simple Spotify playlist previewer without any user authentication required on Next.js!
I've been spending a lot of time on Spotify lately and wanted to share some of my playlists on the web. But just linking out to the playlist didn't feel right, so I spent some time messing around with the Spotify API to see what was actually possible without needing a visitor to login to their account.
As it turns out, there's quite a lot we can do! So today we're going to be building a simple Spotify playlist preview with Next.js! You can browse the source code.
Let's get into it!
Scaffolding
First off, choose a React boilerplate or framework of choice. I'm using Next.js because... well it's awesome and I use it for everything, but you can do this in something like Create React App as well. I'll also be using Tailwind for super quick styling.
Fetching the playlist
We're going to want a utility file that fetches our playlist from the Spotify REST API. In this, we'll want two functions:
getAccessToken
This function, as its name suggests, will authorise us to use the Spotify Web API. Specifically, we'll be using the Client Credentials flow - a server-to-server authentication method that only includes endpoints that do not access user information. So, as long as our playlist is public, this will work fine for our needs.
You'll need to create a Spotify app in their Dashboard and grab your Client ID and Secret. Store these somewhere safe, like an .env.local file.
Spotify's API is a bit weird/dated as it uses a application/x-www-form-urlencoded request body type, which can be tricky to deal with if you're using the Fetch API like I am. Luckily, in this case, it's just a simple string we can hardcode.
const getAccessToken = async (): Promise<string> => {
  const authorization = Buffer.from(
    `${process.env.SPOTIFY_CLIENT_ID ?? ''}:${
      process.env.SPOTIFY_CLIENT_SECRET ?? ''
    }`
  ).toString('base64');
  const grant = await fetch('https://accounts.spotify.com/api/token', {
    method: 'POST',
    headers: {
      Authorization: `Basic ${authorization}`,
      'Content-Type': 'application/x-www-form-urlencoded',
    },
    body: 'grant_type=client_credentials',
  });

  const { access_token } = (await grant.json()) as { access_token: string };

  return access_token;
};
Perfect. Now, we can fetch our playlist using a simple function that takes the ID of a playlist and returns all the relative information and tracks.
getPlaylist
Spotify's surface-level /playlist/:id endpoint only returns the high-level information about the playlist though and doesn't go into great detail when it comes to tracks, so we'll also need to do a subsequent call to a deeper /playlist/:id/tracks endpoint to get some more data.
export const getPlaylist = async (
  id: string
): Promise<{
  data: SpotifyPlaylist;
  tracks: SpotifyTrack[];
}> => {
  const access_token = await getAccessToken();

  const tracksRequest = await fetch(
    `https://api.spotify.com/v1/playlists/${id}/tracks`,
    {
      headers: {
        Authorization: `Bearer ${access_token}`,
      },
    }
  );

  const { items } = (await tracksRequest.json()) as {
    items: SpotifyTrack[];
  };

  const playlistRequest = await fetch(
    `https://api.spotify.com/v1/playlists/${id}`,
    {
      headers: {
        Authorization: `Bearer ${access_token}`,
      },
    }
  );

  const data = (await playlistRequest.json()) as SpotifyPlaylist;

  return {
    data,
    items,
  };
};
Now we have a utility function that hits up the Spotify REST API using the Client Credentials flow and gets our playlists + all its tracks in detail. Let's render it to the screen!
Rendering the playlist
If you're using Next.js, this next part is just super easy. To run this script and fetch the data as props for static generation, just add the following:
export const getStaticProps: GetStaticProps = async () => {
  const { data, items } = await getPlaylist('<your playlist id>');

  return {
    props: {
      data,
      items,
    },
  };
};
Now, before we actually get into rendering this data, I want to add a couple of nifty little data attributes.
Playlist duration (listen time)
Spotify's Playlist endpoint doesn't actually keep track of the running playlist duration, but it's not a problem as we've fetched all the individual tracks and they come with a duration_ms field - the duration of the track in milliseconds.
So, with a bit of wand-waving, we can get this information through a simple reduce function:
const getPlaylistDuration = (tracks: SpotifyTrack[]) =>
  (
    tracks.reduce((acc, track) => acc + track.track.duration_ms, 0) / 3600000
  ).toFixed(1);
The 3600000 btw is 1000 milliseconds _ 60 _ 60, meaning out answer will be given in terms of hours, with the toFixed resolving to 1 decimal place.
Number of artists
To show the number of artists in a playlist, we'll have to do a similar loop over the Tracks. First, for awesome reasons I'll reveal shortly, we're going to make a record of the artists in the playlist, as well as how many times they appear:
const getArtists = (tracks: SpotifyTrack[]) => {
  const artists: { name: string; count: number }[] = [];

  tracks.forEach((track) => {
    track.track.artists.forEach((artist) => {
      const existing = artists.find(({ name }) => name === artist.name);

      if (existing) {
        existing.count += 1;
      } else if (artist.name) {
        artists.push({ name: artist.name, count: 1 });
      }
    });
  });

  return artists;
};
Then, to get the number of artists, we can simply run:
const uniqueArtists = new Set(artists.map((artist) => artist.name)).size;Top artists
Now, the reason I wanted to keep track previously of the artist frequency in the previous loop is to dynamically generate a description for this playlist based on the most popular (or more specifically, recurring) artists within! We can resolve the 5 top artists like so:
const getTopArtists = (artists: { name: string; count: number }[]) =>
artists
.sort((artist1, artist2) => (artist2.count > artist1.count ? 1 : -1))
.slice(0, 5)
.map((artist) => artist.name);
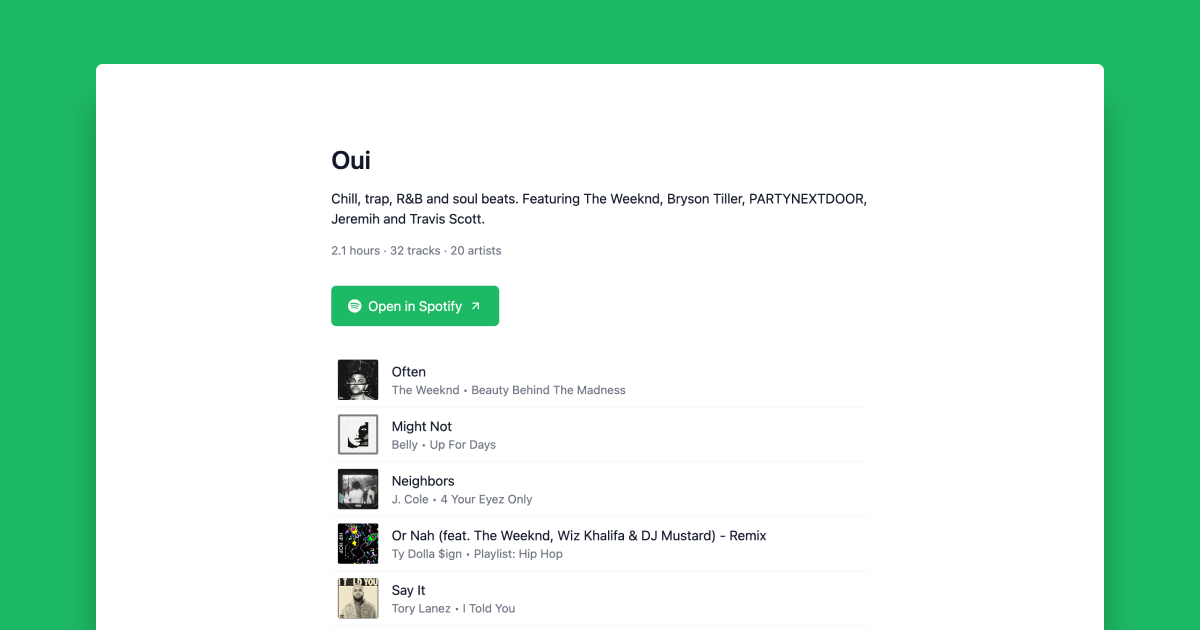
const topArtists = getTopArtists(artists);Nailed it. By combining all this dynamic information with the static information we get back from the Playlist endpoint, we can create a pretty nifty page:
const Playlist: FC<PlaylistProps> = ({ data, tracks }) => {
  const duration = getPlaylistDuration(tracks);
  const artists = getArtists(tracks);
  const uniqueArtists = new Set(artists.map((artist) => artist.name)).size;
  const topArtists = getTopArtists(artists);
  const description = data.description.endsWith('.')
    ? data.description
    : `${data.description}.`;

  return (
    <div className="container mx-auto grid max-w-2xl gap-8 px-4 py-24">
      <div className="grid gap-4">
        <h1 className="text-3xl font-semibold text-gray-900 dark:text-white">
          {data.name}
        </h1>
        <p className="text-md font-normal text-gray-900 dark:text-white">
          <span>{decode(description)} </span>
          <span>Featuring {formatter.format(topArtists)}.</span>
        </p>
        <p className="text-sm text-gray-500 dark:text-gray-400">
          {[
            `${duration} hours`,
            `${data.tracks.total} tracks`,
            `${uniqueArtists.size} artists`,
          ].join(' · ')}
        </p>
      </div>
      <div>
        <a
          className="inline-flex items-center gap-2 rounded-md bg-[#1DB965] px-5 py-3 text-white transition-all hover:-translate-y-1 hover:bg-[#139E53]"
          href={data.external_urls.spotify}
        >
          <Image src="/spotify.svg" width={16} height={16} alt="" />
          <span>Open in Spotify</span>
          <ArrowUpRight size={16} />
        </a>
      </div>
      <div>{tracks.map(Track)}</div>
    </div>
  );
};
I've left a little loop at the bottom for rendering our tracks, so let's write a Track component to use as the callback function!
Rendering the Track
Rendering the track itself shouldn't be too difficult.
const Track = ({ track }: SpotifyTrack, index: number) => (
<Fragment key={track.id}>
{Boolean(index) && (
<hr className="border-t border-gray-100 dark:border-gray-800" />
)}
<div className="relative flex items-center gap-4 p-2">
<div className="relative flex shrink-0 overflow-hidden rounded-sm">
<Image src={track.album.images[0].url} width={48} height={48} />
</div>
<div className="relative flex flex-1 flex-col">
<p className="text-md line-clamp-1 leading-normal text-gray-900 dark:text-white">
{track.name}
</p>
<p className="line-clamp-1 text-sm text-gray-500 dark:text-gray-400">
{track.artists[0].name} • {track.album.name}
</p>
</div>
</div>
</Fragment>
);Now, the real work begins!
Preview on hover
When we hover on the track, I want to play a preview of the song if possible. Sounds crazy difficult right?! Lucky for us, Spotify sometimes returns a preview_url on the Track object which points to a 30-second MP3 preview of the full track.
If we combine this with some time-based JS trickery, we can actually make the audio fade in on hover! A super important thing to note here is that we can't await the play() function even though it's a Promise. By awaiting it, we're essentially locking up the function which can play havoc when we hover-off the track too quickly after hovering on.
const [audio, setAudio] = useState<HTMLAudioElement | null>(null);
const [fadeIn, setFadeIn] = useState<ReturnType<typeof setInterval> | null>(
  null
);

const play = () => {
  if (audio || !track.preview_url) {
    return;
  }

  const newAudio = new Audio(track.preview_url);
  newAudio.volume = 0;

  setActiveTrack(track.id);

  newAudio.play().catch((error) => {
    const message = error instanceof Error ? error.message : (error as string);
    toast.error(message);
  });

  const timer = setInterval(() => {
    if (newAudio.volume < 1) {
      newAudio.volume = Number((newAudio.volume + 0.05).toFixed(2));
    } else if (fadeIn) {
      clearInterval(fadeIn);
    }
  }, 100);

  setFadeIn(timer);
  setAudio(newAudio);
};
Now, for the blur (hover off) function. This employs the same type of logic for fading out the audio.
const stop = () => {
  if (!audio) {
    return;
  }

  const originalVolume = audio.volume;

  setAudio(null);
  setActiveTrack('');

  if (fadeIn) {
    clearInterval(fadeIn);
  }

  setFadeOut(
    setInterval(() => {
      if (audio.volume > 0) {
        audio.volume = Number((audio.volume - 0.05).toFixed(2));
      } else if (fadeOut) {
        clearInterval(fadeOut);
      }
    }, 100)
  );

  setTimeout(
    () => {
      audio.pause();
    },
    (originalVolume / 0.05) * 100
  );
};
Amazing! We can now preview Spotify tracks just by hovering on them without the need for authenticating or building an entire web player. Now we just need to wire these functions up to our Track component from earlier.
When a track starts playing, I want to show the user a progress bar of sorts to indicate what's happening. Because our preview urls are always 30 seconds, we can use a bit of a cheat here and create a div that transitions from width: 0 to width: 100% with a transition duration of 30 seconds.
<Fragment key={track.id}>
{Boolean(index) && (
<hr className="border-t border-gray-100 dark:border-gray-800" />
)}
<div
className={`relative transition-opacity ${
activeTrack && activeTrack !== track.id ? 'opacity-50' : 'opacity-100'
}`}
onMouseOver={play}
onMouseLeave={stop}
onFocus={play}
onBlur={stop}
role="button"
tabIndex={0}
>
{Boolean(track.preview_url) && (
<div
className={`
absolute left-0 top-0 h-full bg-gray-100 dark:bg-gray-800
${audio ? 'w-full transition-all duration-[30s] ease-linear' : 'w-0'}
`}
/>
)}
<div className="relative flex items-center gap-4 p-2">
<div className="relative flex shrink-0 overflow-hidden rounded-sm">
<Image src={track.album.images[0].url} width={48} height={48} />
</div>
<div className="relative flex flex-1 flex-col">
<p className="text-md line-clamp-1 leading-normal text-gray-900 dark:text-white">
{track.name}
</p>
<p className="line-clamp-1 text-sm text-gray-500 dark:text-gray-400">
{track.artists[0].name} • {track.album.name}
</p>
</div>
</div>
</div>
</Fragment>Dealing with browser constraints
Some modern browsers have strict autoplay policies that apply to video and audio. They're fantastic for us as users, resulting in improved user experiences, minimized incentives to install ad blockers and reduced data consumption. However, as developers, it means that we need to do a bit more work to address this.
Coming back to the play() function from earlier, if a user hovers on a track without interacting with the document first, it won't play. Instead, you'll get a console error saying:
Uncaught (in promise) DOMException: play() failed because the user didn't interact with the document first.There's not a whole lot we can do about this, other than handle the problem gracefully and let users know what they need to do to get it working i.e. click anywhere on the page.
Additionally, if we hover on and off a track too quickly, it creates a race condition with the two functions, occasionally resulting in a console error like:
Uncaught (in promise) DOMException: The play() request was interrupted by a call to pause().Here's how we can modify our play() function from earlier to handle these cases nicely by showing a toast:
import { createGlobalState } from 'react-hooks-global-state';

const { useGlobalState } = createGlobalState({
  interactableNotified: false,
  activeTrack: '',
});
const [interactable, setInteractable] = useState<boolean>(false);
const [interactableNotified, setInteractableNotified] = useGlobalState(
'interactableNotified'
);
newAudio
.play()
.then(() => {
setInteractable(true);
if (interactableNotified) {
setInteractableNotified(false);
toast.success('Nice! You’re good to go.');
}
})
.catch((error) => {
const message = error instanceof Error ? error.message : (error as string);
if (message.includes("user didn't interact with the document first")) {
if (!interactableNotified) {
toast('Please click anywhere on the page to preview tracks on hover.');
setInteractableNotified(true);
return;
}
return;
}
if (!message.includes('interrupted by a call to pause()')) {
toast.error(message);
}
});Caveats
The code above doesn't work on mobile just yet as it relies on mouseEnter / mouseLeave handlers, but I'm positive you could figure it out with a bit of thought. On the plus side, it's also keyboard accessible so you can tab your way through track previews!
Anyway, that's all folks! Happy listening and don't forget to follow me on Spotify 😝
Published on April 2, 2022 • 11 min read